
Do you ever have foods that you wish you liked more than you do? I feel that way about winter squash. Almost every year, at least once I get totally sucked into the total Autumn festive-ness that is the winter squash table in the produce isle. They are colorful and comprise all kinds of fun shapes and textures and just seem to embody everything that I love about fall! And so I promptly forget that I don't really care for them, buy a couple and then inevitably it goes like this: I cook up the first one with all kinds of excitement, feel disappointed after the first bite, wonder how in the world I can dislike something that looks so darn pretty and then struggle through the leftovers.
This is precisely what happened a week or two ago when my weekly grocery trip landed me with an acorn squash and butternut squash. The acorn squash is the prettier one so I cooked it first. (Do you see how my mind works???) I just roasted it in the oven and ate it with a little butter and salt and pepper. It was "okay." I think I still have some of it in a tupperware on the bottom shelf of my fridge. Since the acorn squash was a little anti-climatic, that poor, plain butternut squash has been hanging out by itself for a couple weeks in my produce basket.
Yesterday, being my day off, left me feeling inspired to cook something nice for dinner for my sweetheart and I. He is not a picky eater and likes to be adventurous once in a while, so he is a good person to try out new recipes on. I looked online for some ideas on what to do with that butternut squash and low and behold, found an idea that looked fun on the Martha Stewart website. It turned out really good. Jeff approved and proceeded to eat 3/4 of that squash all by himself (and it was a big butternut!)
The original recipe was for 6 squash! I only prepared one. I will put the original quantities below. Just cut back accordingly on the proportions depending on how many you do.
Twice-Baked Butternut Squash
6 butternut squash (or about 9 lbs)
1 1/2 tsp salt
1/2 tsp freshly ground black pepper
1/2 cup plus 1 tablespoon nonfat sour cream (I used the dairy-free Tofutti brand, which substitutes beautifully)
2 tsp paprika
6 fresh chives, cut into 1/8-inch pieces
3 tablespoons fresh breadcrumbs, lightly toasted (Used gluten-free ones and they worked great)
- Heat oven to 450 degrees with the rack in center. Cut the squash in 1/2 lengthwise, remove seeds and fibers and sprinkle with a little of the salt and pepper. Fill a roasting pan with 1/4 inch of water and place the squash in, flesh side up. Cover with foil and bake for 30-40 minutes or until the flesh is tender.
- Reduce oven heat to 425 degrees.
- Remove the squash and cool until you can handle it. Scoop out the flesh, leaving about 1/4 inch with the skin so it will hold its shape.
- In a bowl, combine the flesh and all remaining ingredients except the breadcrumbs with a hand mixer or potato masher so that it is smooth and creamy. Spoon the filling back into the squash skins, top with breadcrumbs and bake for another 20-30 minutes until heated through and slightly browned on top.
For my seasonings, I used my Penzey's Smoked Paprika and added in a little chipotle seasoning. So my dish was a little bit spicy. If I could eat it, I might have added in a little parmesan cheese to the breadcrumbs on top. This would also be really delicious if you were to make it sweet instead of savory and mix in some cinnamon and nutmeg and a little brown sugar with maybe some toasted walnuts on top. Yum!
I have actually found my first squash dish that I will definitely make again and that makes me happy. I hope you enjoy it!
Tuesday, November 23, 2010
Thursday, November 11, 2010
Celebrations!
Quite a few years ago, right after college, I read Celebration of Discipline, by Richard Foster. Although I liked the book, I remember very little of it except that the last chapter was about the discipline of corporate celebration. That chapter stayed with me more than any other in the book because it took me by such surprise. Celebration isn't what I had expected to learn about after working up the nerve to read about about the spiritual disciplines!
I was thinking about that chapter earlier this week as I was able to join one of my closest friends and her husband and a large group of people to celebrate the adoption of their new son, Simon Theodore. I can think of few things more worthy of a wild celebration than the gift of a child. And this child in particular has quite a story, as do his new parents. It has been a privilege for me to get to share in a little part of their journey over the last several years.
AND... I got to make dessert for the party! I re-arranged my work schedule and took off a 1/2 day of work to bury myself in flour and buttermilk and lemon zest and Rice Crispies and Hershey's Special Dark Baking Cocoa. I borrowed my old roommate's standing Kitchen Aid Mixer, which we used to affectionately call, "The She-Beast" because of its weight and awesome mixing power! The She-Beast and I cranked out a chocolate cake, a carrot cake, lemon-vanilla cupcakes with cream cheese frosting, plain vanilla cupcakes with chocolate frosting and last of all, because the food theme was "kid foods," some Rice Cripsy Treats. Whew!
(And I am feeling quite proud to say that this bounty of desserts was all produced in my tiny little 6'x8' kitchen!)
Here are a few pics...
Before:

After:

My dear friend, the star of the show, and me:

Sunday, November 7, 2010
Russian Tea
I really think that one of the sweetest blessings in my life are my girlfriends! The Lord has truly blessed me with some remarkable women to share life with. This afternoon a couple ladies from my office came over for tea. We ate fun, girly foods and drank tea and chattered away for a couple of hours. I was struck by what a precious thing it is to work with ladies like these. They love the Lord and approach life and work with open hearts and speak truth and encouragement to me on a weekly basis. I've been feeling a little overwhelmed this afternoon, to the point of weepiness, with how rich my life is because of the women, inside work and out, who share it with me.

Sigh... Dash away a couple stray tears... Enough of being sentimental! Lets talk tea!
A friend shared this recipe on her blog and I thought it would be fun to try it out this afternoon for our little tea party. Aside from the fact that it made my house smell wonderful, it tasted AMAZING! Enough so that I went back out to the store tonight to get some decaffeinated black tea so that I can make another batch this evening.
At first sip, the tea tastes like a good, spicy apple cider, but if you pay more attention to it, the predominate flavor is actually pineapple, which is fun. Here you go :
Russian Tea
5 1/2 cups water
2 cinnamon sticks
1 1/2 tsp whole cloves
3/4 cup sugar
5 black tea bags
Juice from 2 oranges
Juice from 1 lemon
1 - 6oz can pineapple juice
- Boil water, cinnamon, cloves and sugar for 1 minute.
- Add tea bags and steep, covered, for 20 minutes.
- Strain out spices from tea and add juices.
- Serve hot or cold.
(If you want, you can keep the strained spices and citrus peel and simmer them in some water to make your kitchen smell lovely for the rest of the afternoon!)
That's all. Hope you all have a lovely week!
Tuesday, November 2, 2010
Beefy Chili Stew Yumminess...
Recently I have noticed several gourmet spice shops popping up around town. Other than perhaps the cool kitchen gadget stores, few establishments make me happier than a good spice shop! I could spend an hour just walking around and sniffing jars and daydreaming about my kitchen. The cool thing with most of these stores is that you can buy most of the spices in really small quantities, which makes it fairly inexpensive to try stuff out.
I "just happened" to be driving by Penzey's Spice Shop late Saturday afternoon and somehow 4 little 1 oz jars of Chipotle Powder, Ancho Chili Powder, Adobo Seasoning and Smoked Spanish Paprika hopped into my purse on the way out (paid for of course!!) Just a few days before I had dog-eared a chili recipe on the Cooking Light website that caught my attention because it uses beef stew meat instead of ground beef and I liked the sound of that.
So... Monday morning I set out to take my spices for a test drive and give this new recipe a whirl! HERE is a link to the actual recipe as posted on the Cooking Light website.
However, I ended up making a bunch of changes to the seasonings and I improvised on a few ingredients so below is a recipe that I almost feel like I can call my own.
Jenny's Beefy Chili Stew
(Using the word "beefy" makes me giggle... Don't ask me why)
1 1/2 tsp canola oil, divided
1 1/2 - 2lbs pounds beef stew meat (depending on how beefy you want it)
1 1/2 cups chopped onion
1 cup chopped, roasted anaheim peppers (I had these in my freezer from the farmer's market and they were awesome! You could replace with chopped bell pepper or some kind of canned pepper)
1 tablespoon minced fresh garlic
2/3 cup cabernet sauvignon or dry red wine
1 1/2 T brown sugar
2 T tomato paste
3/4 tsp ancho chili powder
1 1/2 tsp chipotle chili powder
2 tsp adobo seasoning
1/4 tsp smoked paprika
1/4 tsp ground coriander
1/4 tsp ground cinnamon
1 tsp fresh, chopped oregano
1 - 28 oz can whole tomatoes, in juice, roughly chopped
1 - 15 oz can red kidney beans, rinsed and drained
1 - 15 oz can black beans, rinsed and drained
1 - 15oz can sweet corn, rinsed and drained
Salt to taste
(** I know that looks like a lot of ingredients, but the whole thing came together pretty fast)
- Add canola oil to a hot pan and brown the stew meat. Toss into the crock pot.
- Add onion (and bell pepper if using) to the pan. Saute 3 minutes. Add minced garlic and saute another minute.
- Add wine to the pan and scrape up any of the browned bits.
- While it simmers gently, add the next 9 ingredients (through the oregano) and mix.
- Pour over the stew meat in the crock pot and then add the remaining ingredients.
- Cook on high for approximately 4 hours or until meat is tender.
- Garnish with chives, cheddar cheese, sour cream, Fritos (if you are my dad!), etc.
And if you are interested, I learned a few new facts about the spices I bought thanks to an extremely knowledgeable clerk:
Ancho Chili Powder - Ground, dried Poblano chilis, ranges 3-5 out of 10 on a heat scale
Chipotle Chili Powder - Ground, smoked, dried Jalapeno chilis, about a 6.5 out of 10 on a heat scale
Adobo Seasoning - Typically consists of garlic, onion, black pepper, oregano, cumin and cayenne
Enjoy!
Monday, November 1, 2010
My Little Pumpkins...
My sister posted these yesterday from their trip to the pumpkin patch... Makes my heart ache because I can't be there for stuff like this. But are they just the cutest little pumpkins you've ever seen or what??
These sweet faces make me so happy!


I have a new chili recipe simmering away in the crock pot as we speak. Hoping to get it on here in the new few days if it turns out good!
Happy 1st day of November!
These sweet faces make me so happy!


I have a new chili recipe simmering away in the crock pot as we speak. Hoping to get it on here in the new few days if it turns out good!
Happy 1st day of November!
Tuesday, October 26, 2010
Lemon Scallop Fiasco
I have come to accept the fact that an occasional fiasco is just a part of the process of cooking! I have had a couple of duds recently, hence the blog silence!
I decided to write anyway this evening because I gave my Lemon Scallops a valiant effort!
I really enjoy an occasional dinner at P.F. Chang's restaurant. My favorite dish there, hands down, is the Lemon Scallops. Scallops are one of those foods that I love to order in restaurants precisely because I never cook them for myself. However, on our last office order at Coleson Foods, I got brave and ordered myself a pound of Scallops. I spent a little time online and found another blogger who came up with a copy-cat recipe for the P.F. Changs dish that I love. Her recipe is here:
Lemon Scallops
Lets just say that as simple as that sounds, I was just not meant to fry things. I have NEVER had a successful meal that included any form of frying. My oil got too hot and started splattering and burning me and making a greasy mess of my kitchen. The outside of the scallops was mushy and not crispy. I got impatient and after doing the first 1/2 of the scallops in little batches, I gave up, didn't dip them in the egg or flour and just put them all in the pan. But they didn't brown because they were too "crowded". So I got slimy little Scallop balls. Ugh!
Sigh... It makes me laugh to write this out. My kitchen was not a pretty sight tonight!
Of the whole deal, the sauce was actually decent. I got side-tracked trying to wash up a few dishes while it simmered and the green onions overcooked and turned limp and stringy and ugly green-gray. BUT, the flavor of the sauce was actually pretty good. I might try it again sometime and just drizzle it over some kind of broiled fish.
I am convinced that the problems here were "me-related" and not recipe-related. Someone with a better knack for frying things could probably pull this off. For the future, I will allow the talented people at P.F. Changs to give me my Lemon Scallop fix!
On a side note though, I did make some yummy Gluten-Free Pumpkin Chocolate Chip cookies last night. Most of you who read this are not gluten-free people so I'm not planning on putting the recipe here. But let me know if you want it and I'll be happy to share. Off I go to comfort myself with a cookie and clean up my very messy kitchen...
Tuesday, October 12, 2010
(Spicing Up Your Coffee... Update!)
So I tried some other additions to my coffee grounds:
1. Added almond extract - Couldn't taste it...
2. Added Amaretto liqueur - Couldn't taste it...
3. Added cocoa powder - Couldn't taste it...
So this morning I'm back to a little vanilla and a delicate shake of cinnamon and it is wonderful!
If any of you try something else and it works, please share!
Wednesday, October 6, 2010
Spicing up your coffee...
I really enjoy a good flavored coffee. Now... my definition of a "good flavored coffee" is extremely narrow and pretty much leaves me splurging on a pound or two of Gloria Jeans coffee only once or twice a year and drinking it plain the rest of the time. Forgive me, but I will turn my nose up at the flavored coffees or creamers you can buy at the grocery store. But if you happen to live near a Gloria Jeans shop and ever had the urge to buy me coffee (wink wink), my favorites are the Amaretto, Pumpkin Pie, Mocha Merry-Mint and German Chocolate Cake!
That said, my mom and dad went away for a little romantic get-a-way this past weekend and stayed at a B&B in Leadville, CO. (And I must say on a side-note, Mom and Dad, I love that you still do this kind of thing after 33 years of marriage!). My mom sent my sister and I an email last night telling us about their trip and mentioning that the B&B had exceptional coffee. When they asked the hostess about it, she said that she sprinkles some cinnamon and vanilla over the grounds before making it.
Brilliant!
So this morning I gave a few hearty shakes of the cinnamon bottle over my coffee grounds and about a 1/2 tsp of vanilla. I might have slightly overdone it on the cinnamon, but the end result is still really nice! (In other words, don't get carried away in your enthusiasm like I did. Aim for delicate sprinkling as opposed to hearty shaking!)
And, of course, now my wheels are turning about what else I could try. Maybe some almond or mint extract? Or some pumpkin pie spice? Or even a little kahlua or coffee liqueur? Perhaps some cocoa powder?
I'm pretty excited to play around with this over the next week!! If any of you have done something similar or if you try it out, let me know what you think!
Monday, October 4, 2010
Flourless Chocolate Cake
I love being a girl! For as long as I can remember I have loved being a girl. However, I have few quirks that occasionally make me feel distinctly un-feminine (at least by typical American standards...). I don't like shoes, either the wearing of them or the purchasing of them; I hate having to buy a new purse; I get super stressed out over the whole topic of coordinating an outfit with accessories and last (and most atrocious), I don't typically crave chocolate. Once in a great while I can be attacked by a chocolate craving with the best of them, but more often than not my crazed emotional food obsessions lean toward the salty and crunchy (think french fries or potato chips).
But a few months ago I found myself dating this adorable man who LOVES chocolate and specifically seems to love eating chocolate with me! He also happens to be super supportive of my variety of food "issues" and allergies, which has left us exploring what this city has to offer in the way of flourless chocolate cakes. We have found a few really good ones so far and I have actually been pretty surprised at the number of food establishments with one of these on the menu. Our list of keepers thus far includes Biaggi's, the Cafe at Poor Richards and the Wisdom Tea House. The tea house one is my favorite of the three. It turned me right into a puddle on the floor! I have heard that P.F. Changs has one too but we have not tried it yet.
This weekend, I stepped out and made my very own flourless chocolate cake. Jeff's mom sent me the recipe off of the blog of a friend of hers. If you look closely at the recipe below you will very likely think something to the affect of, "What?! Weird!" and maybe even, "Gross!" I will ask you to trust me on this though. I was skeptical as well, but the end result was wonderful with a really rich dark chocolate "fudgy" taste. I would recommend this one even to those of you who can eat regular chocolate cake.
Here you go:
Flourless Chocolate Cake
1 1/2 c. semi-sweet chocolate chips
1 (19oz) can garbanzo beans, rinsed and drained
4 eggs
3/4 c. white sugar
1/2 tsp. baking powder
1 tsp. vanilla
- Preheat the oven to 350 degrees F.
- Grease and flour (with gluten-free flour) a 9-inch cake pan.
- Place chocolate chips in a bowl and heat, stirring every 20 seconds or so until they are melted and smooth.
- Combine beans and eggs in a food processor and process until smooth. Add the sugar and baking powder and pulse to blend. Pour in the melted chocolate and blend until smooth.
- Transfer batter to the prepared cake pan. Bake approximately 40 minutes or until an inserted knife comes out smooth.
Just the plain cake was lovely. Next time I might try adding a little Amarretto and topping it with raspberries and Cool Whip or maybe adding some instant coffee and Kahlua. The possibilities are endless! What is cool is that with the bulk of the cake coming from the beans, it is definitely a much healthier version of "cake" than what is traditional.
If you try it out, let me know what you think!
Tuesday, September 21, 2010
Fresh Muffins
I was in the mood for some muffins this past Saturday morning and as I was pulling out all my stuff, remembered that since moving, I only have access to a little 6-muffin tin! I didn't want to run out to the store to buy a bigger one and I definitely didn't want to hang out in front of my oven all morning swapping out batches of muffins. What to do???
At just the right moment, I remembered an email my sister sent me about 6 months ago about a blog entry that a friend of hers posted, detailing how she and her family make muffin batter, freeze the batter in muffin cups and then pop out just as many as they need to bake on any given morning. I hunted down the email and gave it a try.
I whipped up a batch of the Buttermilk Spice Muffins and added in some shredded zucchini and pecans. I baked 6 muffins in the tin and when they had come out and the tin had cooled, filled up another 6 muffin cups with a paper liner and batter and then froze them. It did take a few swaps, but the batter only took about a 1/2 hour to get firm in my freezer so it still went fairly quickly. (And as it is still summer, it is much more pleasant to hang out in front of the freezer as opposed to the oven!)
I tried out a couple of the frozen muffins on Sunday morning and it worked beautifully!! Interestingly enough, the muffins that has been cooked from frozen batter had a much better consistency. The usual sink-hole that I get in the middle with gluten-free muffins wasn't there. A little weird, but I am not complaining!
Most of you probably have access to a regular size muffin tin, BUT, if you are single and like me, don't need to be left alone during the week with a whole batch of muffins to tempt you or if you like the idea of having warm, fresh muffins every morning with your coffee (or most mornings or just on snowy mornings or whatever your little heart desires...), here's the scoop:
- Make a batch of your favorite muffin mix.
- If you have the silicon muffin "tins" you can fill them right up with batter and then pop them out later. Otherwise, use the paper liners or some plastic wrap. Fill the muffin cups 1/2 way with batter and freeze for at least 30 minutes or until the batter is frozen.
- Put your little frozen muffin batter discs into a freezer ziplock bag and label with type and cooking instructions.
- When you are ready, pull out only as many as you want to cook. Fill any unused muffins cups in the tin about 1/2 way with water.
- Add an extra 5 minutes of cooking time and voila!! Warm, fresh muffins ready with your coffee!
Just so you know, this makes me really happy!
Saturday, September 11, 2010
Vermont Maple Peach Pie
Both my mom and I love to cook. As my adult years have progressed and she and I have shared more recipes, we joke about certain recipes just being better when the other one makes it. This falls mostly on her side. I have multiple recipes that just are never as good when I make them as hers are when she makes the same dish. Do you think that is a psychological phenomenon? Is "mom's cooking" just always going to be the best?
I guess that might be another discussion... Despite the true excellence of my mom's cooking, we have two recipes that somehow turn out better when I make them. One of them is this recipe. My mom complains that her Vermont Maple Peach Pie always turns out runny. For some reason, mine thicken beautifully and it just might be my favorite summer fruit pie. I made one for Jeff and I last weekend over Labor Day, sent 2/3 of it home with him, and then regretted it terribly the next day when I wanted more! If he didn't live on the WAY other side of town, I might have snuck over and taken some of it back.
As we speak, I have 6 lovely peaches sitting in my kitchen tempting me to make one more and keep at least 1/2 of it for myself... We'll see if the peaches or my own tenuous sense of self-control wins out...
But since most of you probably don't fall into a category of "wow-I-ate-way-too-much-dessert-in-the-last-two-weeks", I highly recommend you run out to the store or farmer's market, grab some of the last peaches of the season and try this one out. Consider it a celebration of summertime as the season starts to drift away...
Vermont Maple Peach Pie
Crust:
(Make 2 of the recipe below. Add 1/3 of one of them to the other. Use the larger recipe for the bottom crust. Roll out the small one and use it for the top crust)
1-1/2 cups flour
1-1/2 tsp sugar
¾ tsp salt
½ cup oil
2 Tbs milk
Mix flour, sugar, and salt in pie pan. In separate container, mix oil and milk. Add to flour mixture in pie pan; pat around sides and then bottom of pie pan.
*This is the Dieter-family standard pie crust. Feel free to use your own favorite crust recipe in place of this one.
Peach Filling:
6 large peaches (approx. 2-3/4 lbs)
¼ cup real maple syrup
½ cup firmly packed light brown sugar
¼ tsp freshly grated nutmeg
½ tsp cinnamon
2 Tbs cornstarch or tapioca starch (tapioca starch/flour is my preference as a thickening agent)
*Mix these together and add peaches – let sit 5 minutes and mix again
2 Tbs butter, cut into ½” pieces
1 tsp cinnamon & 1Tbsp sugar (mixed)
- Preheat oven to 400 degrees.
- Cut unpeeled peaches into ½’ slices. Toss in a large bowl with the maple syrup, brown sugar, nutmeg, cinnamon, and cornstarch/tapioca starch.
- Pour filling into the crust, scraping in the juices and any undissolved sugar. If using, distribute the butter pieces evenly over the filling.
- Invert top crust onto top of filling. Brush the pastry with softened butter and sprinkle lightly with cinnamon sugar. Poke in several places with a fork/knife to let steam release.
- Bake in the lower third of the over for 45-50 minutes, or until the top is golden brown and the filling is bubbling. Remove from over and let cool for 1 hour.
Above is the formal recipe. I don't usually add the butter to the pie filling. In general, I am a firm believer that butter makes almost anything better, but in this instance, if you want to lean toward being a little more health-conscious, feel free to leave it out. The pie is wonderful without it.
I also don't usually brush the top crust with butter or do the cinnamon sugar. I feel like the pie is sweet enough on its own. But it does make it look a little prettier so feel free if you want it!
Enjoy :)
Saturday, September 4, 2010
August 30, 2010
Well... This entry will have nothing to do with food. But since most of the people that read this are my good friends, I have decided to share anyway. Just a little over a month ago, I turned 29 years old. I already have a nostalgic, introspective bent, but it kicked into high gear as I began this last year of my 20's. Almost none of the past decade has included the things that I always expected out of my 20's. I am sort of in awe of people who plan out their lives and then actually find themselves living in those plans. Perhaps their goal-setting is better than mine has been. Or perhaps the Lord has just had a different plan for my life than what I expected. Either way, my 20's have been full of surprises and unexpected turns!
If I am honest, I have often not received those surprises graciously and have struggled at times with disappointment and discontent and fear of the future. That said, as I turned 29 and essentially began my 30th year of life, some clarity has come and I am newly aware of the fact that my life is wonderful. I am so much happier being "Jenny" than I was 10 years ago at nineteen. It sounds a bit trite, but I have SO much to be thankful for and so many sources of joy.
In light of all these reflections, I have decided to declare "29" a "birthday year." I am a firm believer in "birthday week" (ie: why limit the celebration to just one day?) and occasionally "birthday month" (ie: I had a belated birthday breakfast with a friend just this morning, 9/4). But I decided that I want to end my 20's being intentional about cultivating gratefulness and celebrating what is good in life.
To help me do that, I will be holding a small and mostly like private celebration of something good in my life every month on the 30th up until my 30th birthday. I will most likely not write about all of them here, but I do want to write about my first one because it was just so lovely!
August 30th was this past Monday and I happen to have Mondays off of work. For the last several years, since my first hike up Stanley canyon to the lake, I have wanted to hike up there on a weekday, when no one is around and go swimming. I have a weird attraction to water that I can't explain. But few things make me feel happier or more peaceful. Usually Stanley reservoir is full of fishermen and I can just imagine the dirty looks I would get if I was romping around in the water and scaring away all their fish! So Monday, I hiked up the canyon with my swimsuit and a towel and a book and it worked out perfectly!! There were people hiking down when I was going up. And there were people hiking up as I was walking down. But for about an hour and a half while I was at the lake, there wasn't a soul in sight!! I swam around the lake and then laid myself out on a rock and baked like a lizard. Surrounded by pine trees and blue sky, alone at a lovely little mountain lake, it was not difficult to call up gratitude and joy over the fact that the Lord has planted me in a place that is full of so much beauty. I can remember being very young, living in Southern California with all its smog and traffic and congestion and longing for open and pretty places. Living in just such a place now is a precious gift from a God who saw that part of my heart all those years ago and didn't scorn the desire as trivial, but answered it. I love that about Him!

Thats all... I just returned from the store with ingredients for a Vermont Maple Peach Pie, which is one of my very favorites and seemed like an appropriate way to usher out the summer. The recipe will be making an appearance here soon!
Wednesday, September 1, 2010
Playing with my food...
I have vivid memories of being somewhere around 5 years old and having irresistible urges to do strange things to my PB&J sandwiches. I would take off the crust and pinch down all the edges to make a little pouch. Or I would squeeze the middle and make different shapes. Once I clamped my fist around the whole thing so the sandwhich actually squeezed out through my fingers! To all of my this, my poor exasperated mother would protest, "Stop playing with your food!!!" I never understood this. I had every intention of eating the mutilated sandwich when I was done and just couldn't understand why I was not allowed to play a little bit first...
Fast forward 25 years. I no longer feel the need to mutilate my sandwiches, but I still REALLY like to play with my food. Except now it just takes on a different form.
Today I got home from work at 6pm, starving and not feeling super enthusiastic about any of my dinner options. I knew I had a raw chicken breast in the fridge that needed to be eaten and I also had a basket of lettuce, beans and herbs from the garden. After a little thought, I decided to try taking some of the flavors from that Brie Cheese appetizer I made last weekend. Here's the result:
I cut the chicken breast in 1/2, lengthwise so that I had two thin cutlets. I dredged them in a tiny bit of flour and then cooked them on a high heat in some olive oil until they were brown and crisp on the outside and just slightly under-done on the inside (sprinkled on a little salt and fresh, ground garlic pepper too). I transferred them to a plate and made a little foil tent so they could hang out and finish cooking the rest of the way.
Back in the hot pan, I added about a teaspoon of butter, a few splashes of white cooking wine, roughly a 1/2 teaspoon of fresh, chopped rosemary and about 1/4 cup chopped walnuts. At the last minute, I added tiny bit of minced garlic too (because isn't anything better with garlic?). The pan was still pretty hot so I just swirled this all around for about a minute and then turned off the heat. I drizzled a tiny bit of honey over the top and let it sit there for a few minutes while I microwave-steamed my garden green beans. Then the glazed nuts went on top of my chicken breast and voila!! It was really yummy! I had no idea if the wine and the honey would work together or if the wine and walnuts would work or if the honey and garlic would be weird. But the whole thing worked beautifully!
I think I should ignore my recipe book and just "play" with my food more often!
Sunday, August 29, 2010
Baked Puff Pastry with Brie, Honey, Walnuts & Rosemary
Most people tend to have strong feelings about Brie Cheese... I've heard the flavor referred to as something akin to dirty feet! However, I strongly disagree and I fall in the camp of "I-love-it-and-will-eat-it-any-day-of-the-week"! Unfortunately, I can't eat it every day of the week without a serious all-out protest staged by my stomach (and my budget). Therefore, despite many a longing glance when I pass it in the deli section at the store, it has been relegated to rare and special occasions.
Just such an occasion rolled around last Friday night when I went to an engagement party for some friends and was asked to bring one of those puff pastry/brie appetizer-type dishes. Despite the fact that I love Brie and love to eat Puff Pastry and Brie that other people have prepared, I have always been strangely intimidated by Puff Pastry and have never attempted a dish that requires it.
After a little internal pep-talk, I conjured up some bravery, marched over to the grocery store freezer section and returned with a package of Pepperidge Farm Puff Pastry, an 8 oz wheel of Brie cheese and some walnuts. A little Rosemary from the garden and some honey from my bathroom cupboard (you'll have to scrounge through my older posts if you don't remember why I keep honey in the bathroom) all combined together into something that was really yummy. This recipe came right off of the Pepperidge Farm website:
Baked Puff Pastry with Brie, Honey, Walnuts & Rosemary
1 sheet of thawed puff pastry (pkg come with 2, pull out one and defrost on the counter top for 1/2 hour and return the other to the freezer until you are ready to use it)
1 8oz wheel of Brie cheese
1/4 walnuts, chopped
2 T honey
1 T fresh rosemary, finely chopped
1 egg
1 T water
- Preheat oven to 400 degrees.
- Mix egg and water in a bowl.
- Mix honey, walnuts & rosemary in another bowl.
- Roll puff pastry sheet out into a 12 inch square. Trim off ends to make a circle.
- Cut the Brie wheel in 1/2 horizontally so that you have two matching discs.
- Place one piece of Brie on the pastry dough, cut side up. Spread the walnut/honey/rosemary mixture over cheese. Top with the other piece of Brie, cut side down.
- Dampen the edges of the pastry dough with the egg/water and fold the edges over the cheese, pressing to seal.
- Turn bundle over and place in a baking dish, folded side down. Decorate the top with pastry scraps, if desired. Brush with more egg mixture.
- Bake at 400 degrees for 20 or until the pastry turns golden brown.
(**The website said to bake for 20 minutes and after 30 minutes, I was starting to fear that my pastry was never going to puff and that I had somehow killed it. However, around the 35 minute mark, it began to puff and brown beautifully. So just go with your oven and take the dish out when it looks nicely browned and "puffed.")
I really liked the combination of sweet honey, rich walnuts and hints of rosemary in this appetizer! Despite what looks like kind of a lot of steps, it was pretty quick to throw together and I will definitely make it again.
Now I have a remaining puff pastry sheet in my freezer. Any ideas on something brilliant to do with it??
Wednesday, August 25, 2010
Pumpkin Pie in August
Some of you might hate me for rushing the end of these last precious few weeks of summer, but I have gotten the itch for Fall early this year! We had about a week and a 1/2 of fierce afternoon thunderstorms here a few weeks ago and the dark skies and blustering winds just did me in. I started craving pumpkin pie and it was only mid-August!
I got online one afternoon to browse recipes and found one from The Joy of Baking website that had an interesting twist. Regular crust. Regular pumpkin pie filling. But a layer of crushed gingersnap cookies and toasted pecans pressed into the raw crust before you add the filling. This got me all excited so when my sister and her family were out for a visit last week, we tried it out. Actually, to be more accurate, my sweet mama tried it out because I had to work. She made the pie during the day and then we all enjoyed a piece that night. As far as pumpkin pie goes, it was awesome, but none of us could taste the cookie/pecan layer. We started brainstorming and thought it might be fun to scratch the regular crust and go graham-cracker crust style, but use gingersnap cookies and crushed, toasted pecans in place of the traditional graham crackers.
We are currently having another lovely Colorado-can't-make-up-its-mind-weather week. So when the temperature dipped down into the 40's last night, inspiration swept over me and I whipped up a pumpkin pie with gingersnap and toasted pecan crust. Doesn't that sound wonderful? Except it didn't turn out like I hoped.... The crust was soft, almost soggy and I wanted it to be crunchy. I don't know how I would pull this off though because I think it would burn if you cooked it first and then had it in the oven for another hour while the pumpkin filling cooked...
So here is my next idea. Normal crust. Normal pumpkin pie filling. Some kind of crumb topping that includes the gingersnaps and toasted pecans. What do you think? Any other brilliant ideas of how the gingersnaps and pecans might be incorporated? In the end, I might decide that plain old pumpkin pie is best, but I am having fun playing with new ideas at the moment!
Feedback please!
Monday, August 16, 2010
Something New for Breakfast
Having food allergies can make you do some weird things. Or maybe I should spin that in a more positive light and say having food allergies has made me more adventurous! I walked into the kitchen at work a few months ago and overheard one of my coworkers telling another coworker that “Jenny eats weird food.” It made me laugh out loud. I guess I have kind of gotten used to eating some things that might seem weird to other people. In general though, I don’t think my food is that weird. Do you?
I was officially weird this week though. I went to Whole Foods last week to buy some sucanot (probably qualifies as a “weird” food, but it’s awesome – if you don’t know what it is, ask…) and got preoccupied with reading the nutrition labels on some of the grains in the bulk section (could also probably qualify as “weird” behavior). I am familiar with all the different kinds of rice and quinoa. However, I have never explored the realms of kamut, barley, buckwheat, amaranth, etc.
I was caught by the nutrition label for the amaranth… It outshines even my beloved quinoa! Get this… These tiny little seed grains pack (approximately) twice the calcium level of cow’s milk (nearly 30% of your daily need), nearly 40% of your daily iron needs, almost 8 grams of fiber and 14 grams of protein along with a nice string of amino acids. I wondered why I have never heard about eating Amaranth if it is so healthy and concluded that it must taste disgusting.
Except, it doesn’t. It’s actually awesome! I bought about 2 cups at Whole Foods and played around with it for breakfast last week. It has a grain to water ratio of 1:3 when you cook it. The seeds are really tiny, close to the size of poppy seeds, and they cook up into something similar to the consistency of Malt-O-Meal or Cream of Wheat – perfect for hot breakfast cereal. Here is what I tried out:
Wednesday breakfast: Cooked 1/3 cup Amaranth in 1 cup chicken broth. Topped with some sautéed yellow bell pepper, red onion, turkey sausage and a scrambled egg. YUM!
Thursday breakfast: Cooked 1/3 cup Amaranth in 1 cup of liquid consisting of ½ water and ½ apple juice. Cut up ½ an apple and added it to the cooking liquid. Topped with some brown sugar and toasted pecans. Turned out pretty good. The apple flavors were really nice, but it was too sweet. Next time I will cook it in the juice, but leave out the extra sugar.
Friday breakfast: Cooked 1/3 cup Amaranth in 1 cup of water. Before cooking, added in about ½ tsp orange zest, a couple shakes of cinnamon, a splash of almond extract and about 1 tsp of brown sugar. Topped with raw pecans. YUM! YUM! YUM! This one was perfect and might become a breakfast staple!
Future ideas… My only other idea at the moment would be to try cooking it in part water, part light coconut milk and then topping it off with some toasted coconut and slivered almonds!
Proudly,
Your weird eater, Jenny
Sunday, August 8, 2010
Chicken Pietro (Biaggis-style)
Biaggi's is one of my favorite restaurants in town. Their White Chocolate Bread Pudding, despite the fact that it is EVERYTHING that I shouldn't be eating, turns me into a blissful little puddle on the floor. It is my complete undoing and might be my favorite dessert of all time! As far as main dishes, the Chicken Pietro is my favorite. It is a dish of chicken and vegetables with a sauce that I have identified partly as balsamic vinegar and rosemary. I couldn't put a finger on what else was in it, but it is delicious!!
Last Sunday for my birthday, Jeff and I went to Biaggi's with one of my girlfriends and her boyfriend. We split the Chicken Pietro and when he enjoyed it as much as I did, I decided the time had come to finally try and figure it out!
Turns out, it was as easy as entering "Chicken Pietro" in the Google search engine and "poof", there it was. Why I didn't try this years ago, I have NO idea. Here you go:
Chicken Pietro
1/4 cup plus 2 tablespoons balsamic vinegar, divided
1/2 cup plus 2 tablespoons extra virgin olive oil, divided
1/4 cup Dijon mustard
2 tablespoons brown mustard (skipped this one because I didn't have it)
2 tablespoons honey
2 teaspoons rosemary
2 tablespoons water
1 teaspoon salt
1 pound boneless skinless chicken breast
1 portobella mushroom, sliced
- In a small bowl, combine 1/4 cup balsamic vinegar, 1/2 cup olive oil, mustard, honey, rosemary, water and salt. Whisk together until smooth.
- Place chicken pieces in a large zipper-top plastic bag and pour half of the sauce over the chicken, making sure all pieces are evenly covered. Refrigerate, covered, for 2 to 24 hours. Reserve the remaining half of the sauce separately.
- In a bowl, whisk together 2 tablespoons balsamic vinegar and 2 tablespoons oil. Add portabella slices and toss to combine. Set aside mixture for at least 15 minutes so mushrooms can marinate.
- Bring reserved half of the sauce to a boil, then reduce heat. Keep warm.
- Sauté mushroom slices with their marinade in a small sauté pan over medium-high heat until soft, about 3 minutes. Keep warm.
- Remove the chicken from the marinade. Using tongs, wipe the grill grate with a paper towel saturated with vegetable oil. (It is important to oil both the chicken and the grill because the honey makes the marinade especially prone to sticking.) Grill the chicken just until cooked through, 3 to 4 minutes per side.
- Serve hot, topped with warmed sauce and sautéed mushrooms.
A few notes:
1. I don't have access to a grill so I just cooked the chicken in a pan with the mushrooms and it worked fine.
2. Even for someone who is a bit of a salt addict, I thought the final result was a little salty. Next time I will omit the salt completely from the sauce and just salt the final dish if I want it.
3. All around, the dish was YUMMY but not quite at the same level as Biaggi's. My guess would be that the quality of balsamic vinegar you use is key! I was finishing off a very old, cheap bottle of the stuff and my sauce was just a little bitter/sour, where as the sauce at Biaggi's is really sweet. So as much as possible, use a good quality of balsamic on this dish!
4. Its not in the original recipe, but I added a splash of Sweet Marsala wine to the sauce at the end when it was heating on the stove. I figure wine in sauce is always a good idea!
5. Because it is what they do at Biaggi's and I felt really cool doing the same, I served this with a side of sauted zucchini, summer squash, carrots and red onion.
6. Jeff's feedback was: "It's awesome! But more sauce and more mushrooms would be even better." So I may double the sauce portion and use two portobellos next time. See? With the recent addition of this man to my life, you all are going to get an extra opinion on all my recipes :)
Happy Sunday!
Friday, July 30, 2010
Garden Harvest

Yay!! We are finally harvesting in the garden and it is thrilling!
When I signed up for this whole gig, I was concerned that I would feel excited in the beginning but then struggle to sustain the commitment through the whole summer and fall. Sometimes I begin things with enthusiasm and then peeter out over time. This didn't happen with my garden though. I am finding myself feeling sad over the thought that I only have another month or two with it and then I will be garden-less over the WHOLE winter. Sigh...
But on a happier note, we are up to our eyeballs in lettuce and spinach and herbs. We harvested sugar snap peas and carrots this week too. I am guessing we will have green beans in a few weeks. We'll see what happens with the peppers and tomatoes. There are lots of green ones and I am full of angst and suspense over whether they will actually ripen before the weather turns cold! The onions are doing beautifully and we'll harvest them in September. Strawberry plants went crazy sending out runners, but never flowered. Maybe next year... Broccoli and brussels sprouts were officially conquered by the dreaded flea beetle. That garlic spray I told you about worked beautifully but we ran out and didn't make another batch for 3 days and in that short time period, those darn beetles came back with a vengeance and finished off the plants. So now we have more lettuce in that patch.
Here are a few pictures of our little harvest the other night:
Buttercrunch Lettuce:

Peas & Carrots (I just heard Forest Gump's voice in my head when I wrote that...):

Basil, Rosemary, Oregano, Cilantro & Chives:

My garden buddy and me:

Happy Friday!
Tuesday, July 27, 2010
Camping Food...
Whew!! I have neglected my poor little cooking blog for nearly 3 weeks now! Partly I have found myself slightly distracted with other "stuff" (wink, wink) and partly I have just not been doing much cooking. My cute little kitchen in my cute little apartment turns into a veritable sauna right around 5pm every day as the sun is going down and even cooking things on the stove top will having me breaking a sweat just standing there. I know... Its totally gross to talk about sweating and cooking at the same time, so I will spare you further details. Suffice it to say that I have been eating a lot of lunch meat with avocado on wasa crackers for dinner :)
However, I went camping last weekend with some girlfriends and I got newly inspired to pick up my writing again because of our dessert one night. Now... my family did not camp a ton when I was growing up but in my adult years, thanks mostly to my dad and my brother-in-law, we get incredibly gourmet with our food when we camp. Those two men have figured out how to do unbelievable things with a smoker, a cast iron skillet and hot coals so we typically eat things like freshly caught, smoked trout or cinnamon rolls or I think Jonathan even made green bean casserole once.
All of this camping food fanciness has left me somewhat oblivious to the simple pleasures of things like a basic bratwurst over the open fire and corn on the cob roasted in coals and hobo dinners AND the glorious banana boat!
That there were camping dessert options beyond s'mores had never really occurred to me. But last year when camping with my sweet friend, Stacey, she introduced me "banana boats." They are basically a banana stuffed with chocolate, peanut butter and/or butterscotch chips and then heated in the fire. It sounds pretty basic and I don't know that it would get me all that excited at home, but after a day in the sun, on the trail, romping through the rocky mountains, these were my undoing!
Here is a little picture tutorial:
1. To begin with, leave the banana in the peel, but cut out a triangular wedge and gently peel it back:

2. I have a weakness for chocolate and peanut butter so I used chocolate and peanut butter chips, but butterscotch chips or white chocolate chips would be pretty wonderful as well. You can also put in some nuts or dried fruit or anything else that sounds yummy.


3. Lower the wedge and wrap the banana securely in sturdy foil.


4. Here is where you might get irritated with me... I did not keep track of how long we let it sit in the coals. I just left it in there until I "figured" it was done. I am guessing it was about 15-20 minutes, turning once or twice.

5. Remove from coals and eat with a spoon.
(And don't turn your nose up at the way this looks. I know it doesn't look super appetizing, but it was DELICIOUS!)


If you have any interest in seeing more pictures, I am going to attempt to embed a little slide show in here from the rest of the trip. We were in the San Juan mountains in southwestern Colorado, near Ouray, and it was stunning! Man, I get to live in such a beautiful place! I was feeling very grateful this weekend :)
(P.S. You will need to click on the "play" button at the bottom of the slide show box and not in the center. If you click in the center, it will just route you to the website with the pictures instead of playing the slide show.)
(P.S. 2 - The "house" pictures are an old abandoned cabin next to one of the old mines)
Monday, July 5, 2010
Blueberry Pancake & Chocolate Spaghetti Noodle Pie

Blueberry Pancake & Chocolate Spaghetti Noodle Pie (w/ a mysterious green something on top)
Ingredients:
1 (very creative) cutie-pie niece
1 doting auntie visiting for the weekend
play-dough in various colors
play-dough toys
1 real cherry pie cooking away in the oven to serve as inspiration
- Place cutie-pie niece and doting auntie in the kitchen to make a cherry pie together.
- While it cooks in the oven and they are feeling inspired, whip out the play-dough and toys.
- Instruct the auntie to roll out small purple play-dough blueberries while the cutie pie niece provides everything else.
- Prepare to spend up to 20 minutes picking small pieces of play-dough out of the carpet and out of cutie-pie niece's clothes. Tell doting auntie to make a "note-to-self" that next time, building a play-dough creation with larger pieces might be a better idea!
(And in case you are interested, here are a few new pics of the cutie-pies themselves!)


Monday, June 28, 2010
When in doubt, add more garlic!
My family sometimes jokes with each other that one of our family cooking mottos is, "When in doubt, add more garlic!" We have a serious affinity for the stuff. I have loved it since I can remember. When I was small, my mom used to give us garlic gel-caps along with our vitamins. I guess there was a health benefit?? (Mom? Why did you do that?) Anyway, I liked them so much that I would actually chew them! Its a good thing that I was cute 'cause chewing those garlic pills made for one stinky little girl!
I had a few adventures with garlic last week that I thought I would share...
Remember how I told you a few weeks ago that nasty little aphids were eating my broccoli, brussels sprouts and green beans plants in the garden? Well, it turns out it wasn't aphids. It was the even nastier dreaded flea beetle! I am learning all kinds of things from hanging out with other gardeners and the flea beetles are truly dreaded. They look like a tiny black flea and once they infest your plants, they can be very difficult to get rid of. BUT alas, there is hope! Apparently (unlike me), they hate garlic! So at one gardener's recommendation, I whipped up the following completely organic, completely stinky pest spray:
1 head of garlic, bulbs peeled and minced
1/2 c. olive oil
2 cups water
a few squirts of Dawn dishwashing liquid
- Mince your garlic in a food processor. Add to the oil and let it sit overnight.
- Strain out the minced garlic.
- Mix the oil with the soap and water in a spray bottle, shake and spray over plants
I have been spraying the affected plants with this concoction about every other day and it has rid us almost entirely of the dreaded flea beetles! HOORAY!! It is very potent and makes me hungry for garlic bread and Italian food when I am spraying, but I can cope with that if the beetles leave my little plant-babies alone!
So... After mixing up that plant spray, I was left with a couple tablespoons worth of perfectly good minced garlic which needed to be used, so I went to one of my trusty recipe sources: Cooking Light, and decided on this recipe for lunch yesterday:
Penne w/ Pistachio Pesto and White Beans
8 ounces uncooked penne pasta (gluten free or regular)
1 cup packed fresh basil leaves
1/4 cup roasted shelled pistachios
6 garlic cloves
2 tablespoons olive oil
1 1/2 cups chopped seeded peeled tomato
1 teaspoon freshly ground black pepper
3/4 teaspoon kosher salt
1 (15-ounce) can cannellini or great northern white beans, rinsed and drained
1 (5-ounce) package arugula (I used spinach because it was cheaper!)
1/4 cup (1 ounce) shredded fresh pecorino Romano cheese
- Cook pasta according to package directions, omitting salt and fat. Drain and rinse with cold water. Drain.
- Combine basil, nuts, and garlic in a food processor; process until finely chopped.
- Heat a large skillet over medium heat. Add olive oil to pan, and swirl to coat. Add basil mixture, and cook for 2 minutes, stirring frequently.
- Stir in pasta, tomato, and next 3 ingredients (through beans) and cook for 2 minutes or until thoroughly heated, tossing to combine.
- Remove from heat. Add arugula or spinach to pan, and toss to slightly wilt.
- Sprinkle w/ cheese and enjoy!!
I really loved this recipe! It was pretty, the basil pesto smelled incredible and the finished product was colorful and tasted delicious. In addition, you've got a fairly easy dish that includes your veggies, starch and protein all in one!
And that is the end of my garlic tale...
Happy Monday!
Wednesday, June 23, 2010
Open-faced Fresh Blueberry Pie
In celebration of our first day of summer, I have yet another fruit pie recipe for you! (Brace yourselves, you might get a few of these... Before the summer is up, I still need to make my fresh cherry pie and my favorite peach pie).
One of my sweet co-workers, Lydia, mentioned that the blueberries at Costco are really good right now and that made me mention that I had an easy blueberry pie recipe. One thing led to another and in the end we struck a deal... She would provide the blueberries and I would make a pie.
This recipe is very similar to the strawberry pie, only a bit easier. You could use this concept for nearly any fruit pie if the fruit is juicy (think peaches, berries, etc as opposed to say apples or pears). Basically you just need to measure a cup of the fruit (whole if small like the blueberry or mashed up if larger like a strawberries or peaches), boil it with a little water, add in some sugar and cornstarch and poof, you have a yummy glaze that goes right over the fruit and crust and thickens in the fridge.
Yay for pie!!
Fresh Blueberry Pie
(My standard crust for fresh-fruit pie):
1 1/2 c. flour
1 1/2 tsp. sugar
3/4 tsp. salt
1/2 c. oil
2 T. milk
- Mix flour, sugar & salt in a pie pan.
- Mix the oil and milk and then add to the flour mixture. Mix with a spoon until just combined.
- Press along the bottom and sides of a pie pan and do whatever you want to do to the edges to make them pretty.
- Bake at 450 degrees for 10-15 minutes until lightly browned. Cool completely.
4-5 c. blueberries, washed and drained
2 T cornstarch, whisked together with 2 T water
1/2 - 3/4 c. sugar
- Separate out 1 c. of the softest blueberries, place them in a saucepan with 1/2 c. water and bring to a soft boil.
- Simmer water and blueberries for approximately 5-8 minutes until the berries have burst, the water has turned that incredibly lovely red/purple and the juices have just started to thicken.
- Add in the sugar and stir until dissolved.
- Add in the cornstarch/water mixture and stir.
- Simmer another 1-2 minutes until the liquid darkens slightly and starts to turn translucent.
- Remove from heat and immediately fold in the remaining blueberries.
- Plop this right into your pie shell and refrigerate at least 2 hours.
Serve with Cool Whip and enjoy!
This is cheesey of me and reveals a glimpse to you all of my tactile/sensory nature, but I adore the color of these berries. The pie tasts fabulous but the color makes me happy deep inside. Eating this for breakfast makes me happy deep inside too. I highly recommend that you cast off all cultural taboos and shamelessly eat your pie for breakfast! It might make you happy deep inside too.
Sunday, June 20, 2010
The Great Idea that That Wasn't...
So yesterday morning I had a hankering' for some pancakes. I had been up for an hour and had my coffee in hand and decided to whip some up with this great gluten-free baking mix I use called Pamela's (think gluten-free Bisquick). As I was getting ready to add in the water I had, what I thought at the time, a stroke of sheer genius! I decided to add my coffee to the egg and baking mix instead of water for some lovely coffee-flavored pancakes! It's an amazing idea right? I didn't know how I could have lived for nearly 29 years and never thought of it before.
So in went a 1/2 cup of my coffee (complete with the cream and sugar) and I was super excited as my lovely, light brown pancakes got all bubbly and puffy in the pan.
But alas, the finished product was a complete disappointment. There was no coffee taste at all in the pancakes and they were slightly more crumbly than normal. Bummer...
I think next time I want coffee-flavored pancakes I'll just head straight for the Kahlua :)
Monday, June 14, 2010
5 Minute Microwave Molten Brownie in a Mug
(Isn't "molten" an incredible word?! It gets my mouth watering before I have even started writing!)
In general, I am not one of those women who goes crazy and cross-eyed for chocolate. If I am going to have a mad hormonal female craving, it will typically go toward the salty and crunchy (ie: french fries!) before it goes toward the sweet and chocolatey. That said, I have my moments where something chocolate is just what is necessary and last night was just such a time. I have been house/puppy sitting for my parents this weekend and last night as I was settling in to watch a movie, I was attacked by a chocolate craving. I started to rummage through their kitchen and the only thing chocolate I could find was soy chocolate ice cream or chocolate chips. Neither were quite right...
Several years ago, I was included on an email chain for a 5-minute microwave chocolate cake. A bunch of my co-workers and I tried it one afternoon and I remember thinking that it was very fun to make, but didn't really taste all that good. I was remembering that concept last night and decided to hop online and see what other kinds of desserts can be microwaved in a coffee mug.
I was completely captured by the word "molten" and ended my search with this recipe. It did, in fact, take only about 5 minutes to whip this up. Now, I will warn you, this brownie is more for those who like a good messey, gooey brownie as opposed to those who like a dignified, pretty, cake-like brownie.
With that warning in place, here you go:
Microwave Molten Brownie in a Mug
4 T flour
4 T sugar
2 T unsweetened cocoa powder
2 T vegetable oil
2 T water
pinch of baking soda
pinch of salt
dash of vanilla
(Anything else that sounds exciting to you such as chocolate chips, peanut butter chips, nuts, almond extract, Bailey's, Kahlua, M&M's, etc. Personally, I went for the Kahlua and it was awesome!)
- Even though we are talking about small quantities, I found it easier to mix everything in a bowl and then plop it into the mug. But do whatever you want. Just mix the dry and wet ingredients separately and then add together. The dough will bit quite thick.
- Microwave your mug of brownie batter for 1 minute.
- Let stand/cool for another minute and enjoy!!!
This brownie is certainly not low in fat or calories and it isn't gluten free. Since I was "cheating" by eating it anyway, I was tempted to just dive in and make it really lethal and top it with the Cookies & Cream ice cream that was in my parent's freezer. But alas, some self-control kicked in and I skipped the ice cream. But for those of you who can eat ice cream without inflicting pain on yourself, I would definitely recommend this brownie with a nice dollop of ice cream on top!!
Happy Monday!
Friday, June 11, 2010
Garden Update
Well, almost a month has passed now since the city finally turned on the water at our community garden and Katie and I were finally able to plant. We have a 25 by 15 foot plot and 8 garden beds to fill and a limited budget so things have sort of gone in stages. However, we put in the last of it last weekend and stuff is sprouting away!
The final list includes: Strawberries, 4 different kinds of peppers, tomatoes, green beans, sugar snap peas, carrots, buttercrunch lettuce, spinach, broccoli, brussels sprouts, basil, chives, oregano, rosemary, thyme, lavender, straweberries, marigolds, nasturiums & chamomile.
In a strange way, I feel like I have been transported back to the 2nd grade when we had a class "garden" sprouted in dixie cups! I feel that kind of ridiculous excitement. I also feel strangely maternal over all my little plant "babies" (although I recognize that it is a little sick to be full of anticipation over the prospect of eating the objects of my maternal affection!)
Anyway, things are mostly growing good. A few of the herbs have not come up yet and only a few of the carrots and lettuces sprouted. But the peppers, tomatoes, sugar snap peas, brussels sprouts and strawberries are all doing beautifully!
Some nasty little aphids have been attacking my broccoli and green beans and I have started researching how to wage full out war on them. Would you like to know what my weapons of warfare will be? Soapy water and manure tea! Muuhahah! (That is my poor attempt at an evil laugh...) The soapy water, in theory, will destroy the oils on the outside of the aphids and keep them from being able to stick to the underside of the leaf. The manure tea (literally, manure steeped in water with a tiny bit of molasses - yum!) will help speed the growth and replenish nutrients that the aphids have sucked out. We'll see how it goes!
I know these pictures are not very exciting yet, but I will share them anyway.
The beginnings of some nasturiums, marigolds & chamomile - all very pretty flowers that happen to be edible!

Walla-walla (sweet) onions, a bell pepper and serano chili pepper:

Lettuce, spinach and some itty-bitty carrots that are too small to see in the picture:

Broccoli & Brussels sprouts:

Tomato plants:

Herb garden bed:

Our plot at a glance:

I am an utter beginner at all of this, so if any of you have gardening tips that you would like to share, I would gobble up any advice (particularly if it has to do with growing tomatoes in our climate or annihilating nasty aphids)!
Wednesday, June 9, 2010
Shrimp Ceviche
Food always gets bonus points for me if it is pretty! And my dinner last night might have been the prettiest meal I have made in a while. It was also quick, healthy and quite conducive to a kitchen that faces west and gets quite toasty as the sun is going down without adding additional heat from the stove!
It is called Shrimp Ceviche. I had seen recipes with "ceviche" in the title before and I always figured it was a Mexican food dish that included beer. That just shows how rusty my Spanish is! Ceviche, (not cerveza) has nothing to do with beer, but rather it is a method of cooking seafood by using the acid in citrus juice instead of heat. A true ceviche recipe will marinate fish or shrimp or scallops in citrus juice for several hours and then proceed. That made me feel a tiny bit creepy and so I liked that this recipe included cooking the shrimp first and then adding in the flavors from a traditional ceviche recipe.
This has some great summer flavors and I hope you enjoy it!!
Shrimp Ceviche
1 lb. raw shrimp (shells and veins removed)
juice of 2 limes, 2 lemons & 2 oranges
1 c. diced cucumber
1/2 c. finely chopped red onion
2 serrano chiles, seeded and chopped
2 garlic cloves, minced (optional)
1 c. diced, seeded tomato
1 avocado
1 T. chopped cilantro
1/4 c. olive oil
1/4 tsp. salt
- Bring 2 quarts of water and 1/4 c. salt to a boil. Add shrimp and immediately remove from heat and cover. Let sit for 3 minutes and then remove shrimp. You could also buy cooked shrimp and skip this step all-together if you want!
- Chop shrimp into 1 inch pieces and combine with juices, cucumber, onion & chiles. Refrigerate for 1 hour.
- Add remaining ingredients & toss to combine.
- Serve plain, with crackers, over rice or even rice noodles.
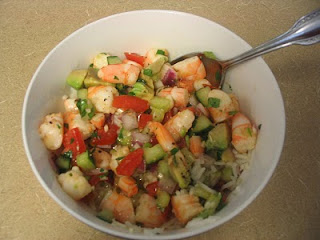

Friday, May 21, 2010
Bourbon BBQ Baby Back Ribs
I passed a small, personal milestone this past week. I made ribs for the very first time! Over the last couple of years, as I creep closer to 30 years old and I am still single, I have become aware of a “list” of sorts, buried deep in my unconscious. It is the list of the things that I have been subconsciously waiting to buy or do or enjoy until I am married. What is strange is that I am not really aware that something is on “the list” until I have an internal dialogue like the one I had this week:
Me: “Sigh… I am totally craving ribs!”
Me: “You don’t know how to make ribs.”
Me: “Men know how to make ribs.
Me: “Then you’ll just have to wait until you have a boyfriend or husband and then he can spontaneously grill you some ribs when you get a craving.”
Awareness of the totally irrational nature of these thoughts suddenly dawns…
Me: “HECK! I don’t have to wait for a man! I know how to cook! I can make ribs all by myself!”
A couple years ago, I had a similar internal dialogue to the one above regarding using a grill/bbq and I am very proud to say that I can grill a pretty good steak all on my own! I have no idea what other kinds of irrational thoughts are hanging out on this list, but if more pop up and they pertain to food, then I will be very proud to share my new accomplishments here with all of you!
In the meantime, here is the rib recipe that I used and it was YUMMY! I no longer have access to a grill and needed something that could cook while I was at work. The slow cooker did beautiful things to the meat! By the time I pulled them out, the meat had literally fallen off the bones for several of them. It was super tender!
Bourbon BBQ Baby Back Ribs
(From Cooking Light website)
5 lbs baby back ribs (beef or pork) – I used about 3.5lbs because a girl just doesn’t need that much beef all by herself, even making multiple meals!
1 ½ tsp salt
1 tsp pepper
1 c. ketchup (I used ½ c. ketchup and ½ c. prepared bbq sauce because I ran out of ketchup)
1 c. loosely packed brown sugar
½ c. bourbon whiskey
¼ c. prepared horseradish (not the creamy kind, the minced/pulpy kind)
½ tsp hot sauce (like Tabasco)
- Place ribs, meaty side up in a roasting pan, sprinkle w/ salt and pepper & roast at 475 degrees for 30 minutes. The point of this is to make the outside of the ribs all brown and crunchy. I was doing this step before work and for some reason, despite the total absence of visible smoke, turning my oven this high set off the smoke alarms in my old-house kitchen, at 6am!! (Don’t you wish you were one of my housemates??!). So I ended up skipping this part and just going straight to the slow cooker after only about 10 minutes in the oven. They still turned out good and also looked very pretty – so I might skip the roasting step all together next time.
- Meanwhile, combine the ketchup/bbq sauce, sugar, bourbon & horseradish in a measuring cup and whisk until blended.
- Arrange ribs in a 6-qt slow cooker and pour sauce over each layer. (You will have to cut them up)
- Cook on LOW for 9 hours.
- Remove sauce from cooker, skim off the fat that rises to the top and simmer on the stove until it thickens and reduces by about ½. This took me roughly 20 minutes.
- Pour sauce over ribs and serve with lots of napkins!!
Lastly, I have a question for those of you who might have an opinion. I simmered the sauce until it thickened and poured some over the ribs, but still had quite a bit left. So I refrigerated the leftovers and put it back in the crock-pot today with some chicken. Was that okay? Do you any of you know of any health safety reasons why a sauce that has already been cooked and then refrigerated, shouldn’t go back into a slow cooker?
Sunday, May 16, 2010
Shrimp & Rice Noodles with Garlic Chili Sauce
So I have to post fast this afternoon because I am at the library and need to get home in a few minutes to meet up with a friend!
But I wanted to share my dinner recipe from last Friday night. I had a friend over and tried a new recipe and it was wonderful! The recipe is basically a sauce recipe and then you can put it with anything you like. The original version came from Cooking Light and called for the sauce with shredded pork and fettuccine. I needed it to be gluten-free and had some shrimp on hand so I went with shrimp and rice noodles. I have leftover noodles and am going to whip up some more sauce and do stir-fried veggies with noodles and sauce for dinners this week. I was thinking next time I might add a little more water and make it into a soup with some veggies and chicken. See? Super versitile!
Garlic Chili Sauce
1/4 c. almond butter
2 1/2 T low-sodium soy sauce
2 T rice vinegar
1 T minced, fresh ginger
1 1/2 tsp garlic chili sauce (I used the bottled Sriracha sauce that I LOVE!)
1/2 tsp garlic powder
1 c thinly sliced green onions
1/3 c chopped, fresh mint (optional)
- Wisk together everything except the green onions and mint with an additional 2 T warm water.
- Pour over your noodles or veggies or meat or whatever and top with the onions and mint.
- I had everything on hand for this except the mint so I skipped that part.
- This sauce was super flavorful, but also quite spicy. I think it would still taste good if you left the chili sauce out or you could mix it up and then add a little chili sauce at a time until it has the desired heat.
Happy Sunday! I hope yours has been as lovely as mine :)
Friday, May 14, 2010
Home Sweet Home
So I promised some pictures of my place and here they are! I still have a few things to hang on the walls, but you can see the gist of it. I ended up painting in the living room, kitchen and my bedroom and I am thrilled with how it turned out. In addition to the rooms below, I have a second bedroom which will serve as dining room/guest room/craft room. However, for now it is my "box" room as I finish getting unpacked, so it wasn't really worth a picture. I considered taking a picture of the outside of the house, but since this is a public site, I decided not to. So far, my experience here has been wonderful! My neighbors have been incredibly quiet and mostly friendly and my commute to work is only about 7 minutes! I am also within walking distance of downtown, the library and a couple nice trails and parks. The Lord really has given me a sweet gift in this new home!
Welcome to my very cute, little apartment!
This is the hallway you see when you walk in the front door:

My tiny kitchen:

Cozy bedroom:

I'm still adjusting to this little bathroom. You'll notice the conspicuous absence of a shower...

Lastly, my living room:

For those of you who live in town, I am looking forward to having friends over soon! For those of you who don't, you'll just have to come visit me!
Happy Friday :)
Subscribe to:
Posts (Atom)
