
My family sometimes jokes with each other that one of our family cooking mottos is, "When in doubt, add more garlic!" We have a serious affinity for the stuff. I have loved it since I can remember. When I was small, my mom used to give us garlic gel-caps along with our vitamins. I guess there was a health benefit?? (Mom? Why did you do that?) Anyway, I liked them so much that I would actually chew them! Its a good thing that I was cute 'cause chewing those garlic pills made for one stinky little girl!
I had a few adventures with garlic last week that I thought I would share...
Remember how I told you a few weeks ago that nasty little aphids were eating my broccoli, brussels sprouts and green beans plants in the garden? Well, it turns out it wasn't aphids. It was the even nastier dreaded flea beetle! I am learning all kinds of things from hanging out with other gardeners and the flea beetles are truly dreaded. They look like a tiny black flea and once they infest your plants, they can be very difficult to get rid of. BUT alas, there is hope! Apparently (unlike me), they hate garlic! So at one gardener's recommendation, I whipped up the following completely organic, completely stinky pest spray:
1 head of garlic, bulbs peeled and minced
1/2 c. olive oil
2 cups water
a few squirts of Dawn dishwashing liquid
- Mince your garlic in a food processor. Add to the oil and let it sit overnight.
- Strain out the minced garlic.
- Mix the oil with the soap and water in a spray bottle, shake and spray over plants
I have been spraying the affected plants with this concoction about every other day and it has rid us almost entirely of the dreaded flea beetles! HOORAY!! It is very potent and makes me hungry for garlic bread and Italian food when I am spraying, but I can cope with that if the beetles leave my little plant-babies alone!
So... After mixing up that plant spray, I was left with a couple tablespoons worth of perfectly good minced garlic which needed to be used, so I went to one of my trusty recipe sources: Cooking Light, and decided on this recipe for lunch yesterday:
Penne w/ Pistachio Pesto and White Beans
8 ounces uncooked penne pasta (gluten free or regular)
1 cup packed fresh basil leaves
1/4 cup roasted shelled pistachios
6 garlic cloves
2 tablespoons olive oil
1 1/2 cups chopped seeded peeled tomato
1 teaspoon freshly ground black pepper
3/4 teaspoon kosher salt
1 (15-ounce) can cannellini or great northern white beans, rinsed and drained
1 (5-ounce) package arugula (I used spinach because it was cheaper!)
1/4 cup (1 ounce) shredded fresh pecorino Romano cheese
- Cook pasta according to package directions, omitting salt and fat. Drain and rinse with cold water. Drain.
- Combine basil, nuts, and garlic in a food processor; process until finely chopped.
- Heat a large skillet over medium heat. Add olive oil to pan, and swirl to coat. Add basil mixture, and cook for 2 minutes, stirring frequently.
- Stir in pasta, tomato, and next 3 ingredients (through beans) and cook for 2 minutes or until thoroughly heated, tossing to combine.
- Remove from heat. Add arugula or spinach to pan, and toss to slightly wilt.
- Sprinkle w/ cheese and enjoy!!
I really loved this recipe! It was pretty, the basil pesto smelled incredible and the finished product was colorful and tasted delicious. In addition, you've got a fairly easy dish that includes your veggies, starch and protein all in one!
And that is the end of my garlic tale...
Happy Monday!
Monday, June 28, 2010
Wednesday, June 23, 2010
Open-faced Fresh Blueberry Pie
In celebration of our first day of summer, I have yet another fruit pie recipe for you! (Brace yourselves, you might get a few of these... Before the summer is up, I still need to make my fresh cherry pie and my favorite peach pie).
One of my sweet co-workers, Lydia, mentioned that the blueberries at Costco are really good right now and that made me mention that I had an easy blueberry pie recipe. One thing led to another and in the end we struck a deal... She would provide the blueberries and I would make a pie.
This recipe is very similar to the strawberry pie, only a bit easier. You could use this concept for nearly any fruit pie if the fruit is juicy (think peaches, berries, etc as opposed to say apples or pears). Basically you just need to measure a cup of the fruit (whole if small like the blueberry or mashed up if larger like a strawberries or peaches), boil it with a little water, add in some sugar and cornstarch and poof, you have a yummy glaze that goes right over the fruit and crust and thickens in the fridge.
Yay for pie!!
Fresh Blueberry Pie
(My standard crust for fresh-fruit pie):
1 1/2 c. flour
1 1/2 tsp. sugar
3/4 tsp. salt
1/2 c. oil
2 T. milk
- Mix flour, sugar & salt in a pie pan.
- Mix the oil and milk and then add to the flour mixture. Mix with a spoon until just combined.
- Press along the bottom and sides of a pie pan and do whatever you want to do to the edges to make them pretty.
- Bake at 450 degrees for 10-15 minutes until lightly browned. Cool completely.
4-5 c. blueberries, washed and drained
2 T cornstarch, whisked together with 2 T water
1/2 - 3/4 c. sugar
- Separate out 1 c. of the softest blueberries, place them in a saucepan with 1/2 c. water and bring to a soft boil.
- Simmer water and blueberries for approximately 5-8 minutes until the berries have burst, the water has turned that incredibly lovely red/purple and the juices have just started to thicken.
- Add in the sugar and stir until dissolved.
- Add in the cornstarch/water mixture and stir.
- Simmer another 1-2 minutes until the liquid darkens slightly and starts to turn translucent.
- Remove from heat and immediately fold in the remaining blueberries.
- Plop this right into your pie shell and refrigerate at least 2 hours.
Serve with Cool Whip and enjoy!
This is cheesey of me and reveals a glimpse to you all of my tactile/sensory nature, but I adore the color of these berries. The pie tasts fabulous but the color makes me happy deep inside. Eating this for breakfast makes me happy deep inside too. I highly recommend that you cast off all cultural taboos and shamelessly eat your pie for breakfast! It might make you happy deep inside too.
Sunday, June 20, 2010
The Great Idea that That Wasn't...
So yesterday morning I had a hankering' for some pancakes. I had been up for an hour and had my coffee in hand and decided to whip some up with this great gluten-free baking mix I use called Pamela's (think gluten-free Bisquick). As I was getting ready to add in the water I had, what I thought at the time, a stroke of sheer genius! I decided to add my coffee to the egg and baking mix instead of water for some lovely coffee-flavored pancakes! It's an amazing idea right? I didn't know how I could have lived for nearly 29 years and never thought of it before.
So in went a 1/2 cup of my coffee (complete with the cream and sugar) and I was super excited as my lovely, light brown pancakes got all bubbly and puffy in the pan.
But alas, the finished product was a complete disappointment. There was no coffee taste at all in the pancakes and they were slightly more crumbly than normal. Bummer...
I think next time I want coffee-flavored pancakes I'll just head straight for the Kahlua :)
Monday, June 14, 2010
5 Minute Microwave Molten Brownie in a Mug
(Isn't "molten" an incredible word?! It gets my mouth watering before I have even started writing!)
In general, I am not one of those women who goes crazy and cross-eyed for chocolate. If I am going to have a mad hormonal female craving, it will typically go toward the salty and crunchy (ie: french fries!) before it goes toward the sweet and chocolatey. That said, I have my moments where something chocolate is just what is necessary and last night was just such a time. I have been house/puppy sitting for my parents this weekend and last night as I was settling in to watch a movie, I was attacked by a chocolate craving. I started to rummage through their kitchen and the only thing chocolate I could find was soy chocolate ice cream or chocolate chips. Neither were quite right...
Several years ago, I was included on an email chain for a 5-minute microwave chocolate cake. A bunch of my co-workers and I tried it one afternoon and I remember thinking that it was very fun to make, but didn't really taste all that good. I was remembering that concept last night and decided to hop online and see what other kinds of desserts can be microwaved in a coffee mug.
I was completely captured by the word "molten" and ended my search with this recipe. It did, in fact, take only about 5 minutes to whip this up. Now, I will warn you, this brownie is more for those who like a good messey, gooey brownie as opposed to those who like a dignified, pretty, cake-like brownie.
With that warning in place, here you go:
Microwave Molten Brownie in a Mug
4 T flour
4 T sugar
2 T unsweetened cocoa powder
2 T vegetable oil
2 T water
pinch of baking soda
pinch of salt
dash of vanilla
(Anything else that sounds exciting to you such as chocolate chips, peanut butter chips, nuts, almond extract, Bailey's, Kahlua, M&M's, etc. Personally, I went for the Kahlua and it was awesome!)
- Even though we are talking about small quantities, I found it easier to mix everything in a bowl and then plop it into the mug. But do whatever you want. Just mix the dry and wet ingredients separately and then add together. The dough will bit quite thick.
- Microwave your mug of brownie batter for 1 minute.
- Let stand/cool for another minute and enjoy!!!
This brownie is certainly not low in fat or calories and it isn't gluten free. Since I was "cheating" by eating it anyway, I was tempted to just dive in and make it really lethal and top it with the Cookies & Cream ice cream that was in my parent's freezer. But alas, some self-control kicked in and I skipped the ice cream. But for those of you who can eat ice cream without inflicting pain on yourself, I would definitely recommend this brownie with a nice dollop of ice cream on top!!
Happy Monday!
Friday, June 11, 2010
Garden Update
Well, almost a month has passed now since the city finally turned on the water at our community garden and Katie and I were finally able to plant. We have a 25 by 15 foot plot and 8 garden beds to fill and a limited budget so things have sort of gone in stages. However, we put in the last of it last weekend and stuff is sprouting away!
The final list includes: Strawberries, 4 different kinds of peppers, tomatoes, green beans, sugar snap peas, carrots, buttercrunch lettuce, spinach, broccoli, brussels sprouts, basil, chives, oregano, rosemary, thyme, lavender, straweberries, marigolds, nasturiums & chamomile.
In a strange way, I feel like I have been transported back to the 2nd grade when we had a class "garden" sprouted in dixie cups! I feel that kind of ridiculous excitement. I also feel strangely maternal over all my little plant "babies" (although I recognize that it is a little sick to be full of anticipation over the prospect of eating the objects of my maternal affection!)
Anyway, things are mostly growing good. A few of the herbs have not come up yet and only a few of the carrots and lettuces sprouted. But the peppers, tomatoes, sugar snap peas, brussels sprouts and strawberries are all doing beautifully!
Some nasty little aphids have been attacking my broccoli and green beans and I have started researching how to wage full out war on them. Would you like to know what my weapons of warfare will be? Soapy water and manure tea! Muuhahah! (That is my poor attempt at an evil laugh...) The soapy water, in theory, will destroy the oils on the outside of the aphids and keep them from being able to stick to the underside of the leaf. The manure tea (literally, manure steeped in water with a tiny bit of molasses - yum!) will help speed the growth and replenish nutrients that the aphids have sucked out. We'll see how it goes!
I know these pictures are not very exciting yet, but I will share them anyway.
The beginnings of some nasturiums, marigolds & chamomile - all very pretty flowers that happen to be edible!

Walla-walla (sweet) onions, a bell pepper and serano chili pepper:

Lettuce, spinach and some itty-bitty carrots that are too small to see in the picture:

Broccoli & Brussels sprouts:

Tomato plants:

Herb garden bed:

Our plot at a glance:

I am an utter beginner at all of this, so if any of you have gardening tips that you would like to share, I would gobble up any advice (particularly if it has to do with growing tomatoes in our climate or annihilating nasty aphids)!
Wednesday, June 9, 2010
Shrimp Ceviche
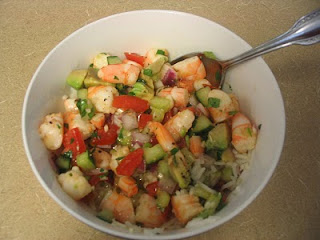
Food always gets bonus points for me if it is pretty! And my dinner last night might have been the prettiest meal I have made in a while. It was also quick, healthy and quite conducive to a kitchen that faces west and gets quite toasty as the sun is going down without adding additional heat from the stove!
It is called Shrimp Ceviche. I had seen recipes with "ceviche" in the title before and I always figured it was a Mexican food dish that included beer. That just shows how rusty my Spanish is! Ceviche, (not cerveza) has nothing to do with beer, but rather it is a method of cooking seafood by using the acid in citrus juice instead of heat. A true ceviche recipe will marinate fish or shrimp or scallops in citrus juice for several hours and then proceed. That made me feel a tiny bit creepy and so I liked that this recipe included cooking the shrimp first and then adding in the flavors from a traditional ceviche recipe.
This has some great summer flavors and I hope you enjoy it!!
Shrimp Ceviche
1 lb. raw shrimp (shells and veins removed)
juice of 2 limes, 2 lemons & 2 oranges
1 c. diced cucumber
1/2 c. finely chopped red onion
2 serrano chiles, seeded and chopped
2 garlic cloves, minced (optional)
1 c. diced, seeded tomato
1 avocado
1 T. chopped cilantro
1/4 c. olive oil
1/4 tsp. salt
- Bring 2 quarts of water and 1/4 c. salt to a boil. Add shrimp and immediately remove from heat and cover. Let sit for 3 minutes and then remove shrimp. You could also buy cooked shrimp and skip this step all-together if you want!
- Chop shrimp into 1 inch pieces and combine with juices, cucumber, onion & chiles. Refrigerate for 1 hour.
- Add remaining ingredients & toss to combine.
- Serve plain, with crackers, over rice or even rice noodles.

Subscribe to:
Posts (Atom)
